You’re standing in your living room with a new projector in hand, staring at a blank wall. Where exactly should you mount this thing? Too close and the image won’t fill your screen. Too far and you’ll run out of space. This is where a projector throw distance calculator becomes your best friend.
A projector throw distance calculator helps you determine the exact distance between your projector and screen based on throw ratio and desired image size. By understanding throw ratios, measuring your space accurately, and using simple formulas or online tools, you can position your projector perfectly without guesswork. This ensures sharp focus, proper image size, and optimal viewing experience every time.
Understanding throw ratio basics
Every projector has a throw ratio. This number tells you how far the projector needs to be from the screen to create a specific image width.
The formula is simple: throw distance divided by image width equals throw ratio.
If a projector sits 10 feet from the wall and projects a 5-foot-wide image, the throw ratio is 2.0. That means for every foot of image width, you need two feet of distance.
Most projectors list their throw ratio in the specifications. You might see something like 1.5:1 or a range like 1.2 to 1.5:1 if the projector has a zoom lens.
Short throw projectors have ratios below 1.0. Ultra-short throw models go even lower, sometimes 0.3 or less. These sit very close to the screen.
Standard throw projectors typically range from 1.5 to 2.0. Long throw models go above 2.0 and work best in large spaces like auditoriums.
How to calculate throw distance manually
You can calculate throw distance without any fancy tools. Just grab your projector’s throw ratio and decide how wide you want your image.
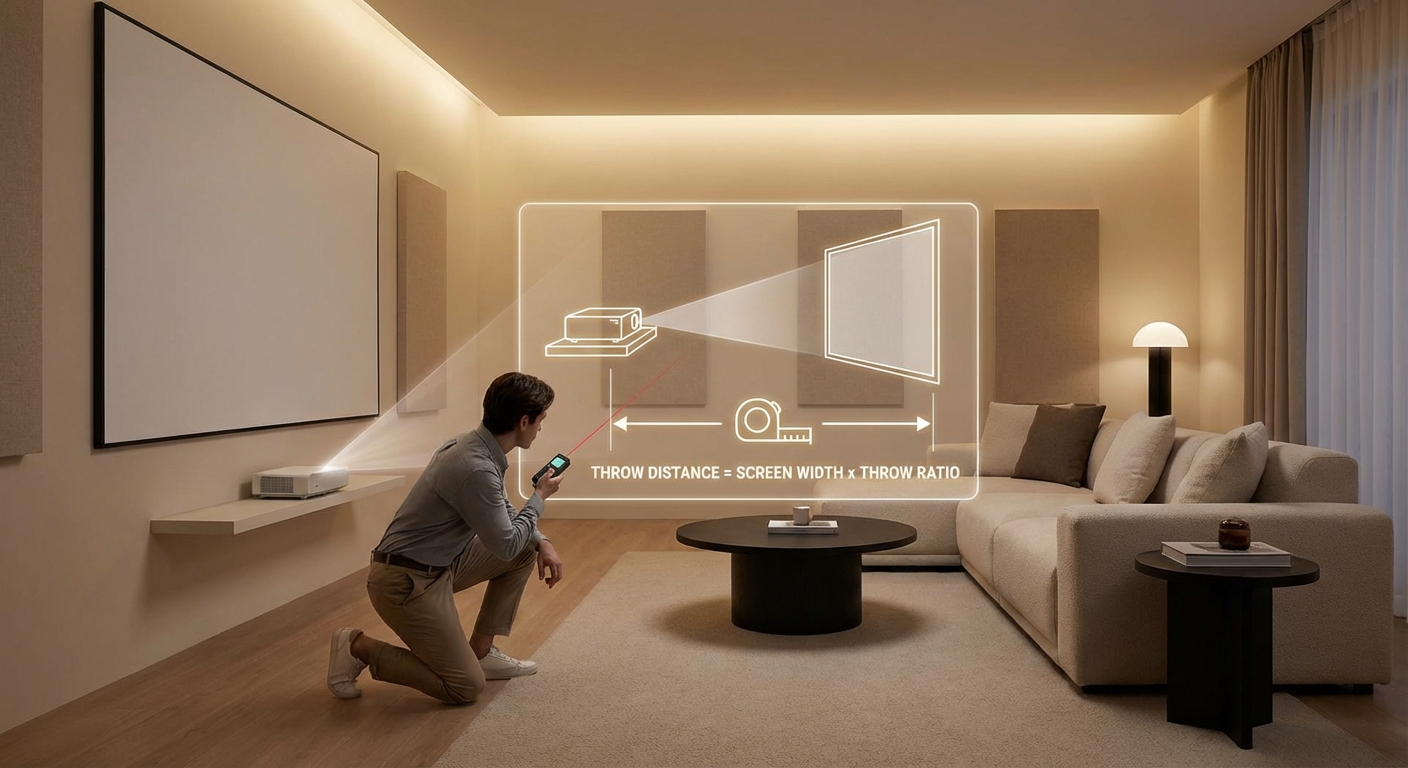
Here’s the basic formula:
Throw Distance = Image Width × Throw Ratio
Let’s say you want a 100-inch diagonal screen. Most screens use a 16:9 aspect ratio, which means a 100-inch diagonal gives you an image width of about 87 inches (7.25 feet).
If your projector has a throw ratio of 1.5:1, multiply 7.25 by 1.5. You get 10.875 feet, or about 10 feet 10 inches.
That’s how far your projector lens needs to be from the screen.
For projectors with zoom lenses, you’ll see a range. A ratio of 1.2 to 1.5:1 means you can place the projector anywhere between 8.7 feet and 10.875 feet for that same 87-inch-wide image.
Working backward from your room size
Sometimes you don’t get to choose where the projector goes. Your room layout decides for you.
Maybe you have a shelf 12 feet from your wall. Or ceiling joists that limit your mounting options. You need to work backward to find what screen size fits.
Use this reversed formula:
Image Width = Throw Distance ÷ Throw Ratio
If your projector must sit 12 feet away and has a 1.5:1 throw ratio, divide 12 by 1.5. You get 8 feet of image width.
An 8-foot-wide image with 16:9 aspect ratio gives you roughly a 110-inch diagonal screen. Perfect for movie nights.
This backward calculation saves you from buying a screen that won’t work with your space.
Using online throw distance calculators

Manual math works fine, but online calculators speed things up and reduce errors.
Most projector manufacturers offer calculators on their websites. Epson, BenQ, Sony, and others have tools specific to their models.
These calculators know the exact throw ratios for each projector. You just enter your desired screen size or available distance, and they do the rest.
Generic calculators work too. Sites like ProjectorCentral have databases covering thousands of projector models. Type in your model number, enter your screen size, and get instant results.
The advantage? These tools often include offset calculations, which we’ll cover next.
Accounting for vertical and horizontal offset
Throw distance isn’t the only measurement that matters. Projectors also shift the image up, down, or sideways from the lens.
This shift is called offset, usually expressed as a percentage of image height.
A projector with 10% vertical offset placed at the same height as the screen bottom will project an image that starts 10% of its height above the lens.
For a 60-inch-tall image, that’s 6 inches of upward shift.
This matters when mounting. If you ceiling-mount a projector, you need to account for how far below the lens the image appears.
Some projectors offer lens shift, letting you adjust this offset without moving the whole unit. Others have fixed offset, meaning you must position the projector precisely.
Horizontal offset works the same way but affects left-right positioning. Useful if your projector can’t sit directly centered on the screen.
Common projector types and their typical ratios
Different projector categories have different throw characteristics. Knowing which type you have helps narrow down your calculations.
| Projector Type | Typical Throw Ratio | Best For | Mounting Distance (100″ Screen) |
|---|---|---|---|
| Ultra-short throw | 0.2 to 0.4:1 | Small rooms, wall mounting | 1 to 3 feet |
| Short throw | 0.4 to 1.0:1 | Medium rooms, limited space | 3 to 7 feet |
| Standard throw | 1.2 to 2.0:1 | Most home theaters | 10 to 17 feet |
| Long throw | 2.0 to 4.0:1 | Large venues, auditoriums | 17 to 34 feet |
Ultra-short throw projectors sit inches from the screen. Perfect for living rooms where you can’t run cables across the ceiling.
Short throw models give you flexibility. They work in bedrooms, offices, and smaller home theaters without dominating the room.
Standard throw projectors are the most common. They balance image quality, price, and installation ease.
Long throw units belong in churches, conference centers, and screening rooms where distance isn’t an issue.
Step-by-step setup process
Ready to position your projector? Follow these steps for accurate placement.
-
Measure your screen width in inches or feet. For diagonal measurements, convert to width using aspect ratio charts.
-
Find your projector’s throw ratio in the manual or manufacturer website. Write down both minimum and maximum if it has zoom.
-
Calculate throw distance using the formula or online calculator. Add a few inches of wiggle room for fine-tuning.
-
Mark the mounting location on your ceiling or shelf. Use a laser level to ensure it’s centered on the screen.
-
Check vertical offset specifications. Measure from the lens position to where the image will appear.
-
Install the mount or place the projector. Don’t fully tighten bolts yet.
-
Power on and project a test image. Adjust position until the image fills your screen edge to edge.
-
Use keystone correction sparingly. Physical positioning always beats digital correction for image quality.
-
Tighten all mounting hardware once positioned correctly.
-
Run cables and secure them to prevent sagging or pulling on the projector.
This methodical approach prevents the frustration of drilling new holes or buying extension mounts.
Dealing with zoom lenses and lens shift
Zoom lenses give you installation flexibility. Instead of one fixed throw ratio, you get a range.
A 1.3 to 2.1:1 zoom means you can adjust the image size without moving the projector. Handy if your initial calculations were slightly off.
But zoom affects brightness. Maximum zoom (telephoto end) often reduces light output by 10 to 20 percent compared to minimum zoom (wide end).
For the brightest image, position your projector at the minimum throw distance and use the wide end of the zoom.
Lens shift is different. It moves the lens element inside the projector to reposition the image without moving the entire unit.
Vertical lens shift lets you raise or lower the image. Horizontal shift moves it left or right.
This is incredibly useful for ceiling mounts. You can mount the projector where the joists are, then shift the lens to center the image on your screen.
Not all projectors have lens shift. Budget models usually skip this feature. Check specifications before buying if installation flexibility matters to you.
Troubleshooting common placement problems
Even with careful calculations, issues pop up. Here’s how to fix the most common ones.
Image too small: Your projector is too close. Move it back or use the telephoto end of your zoom lens.
Image too large: Projector is too far. Move it closer or zoom in.
Image tilted or trapezoidal: Projector isn’t level or perpendicular to the screen. Adjust the mount angle. Use keystone correction only as a last resort.
Blurry edges: Focus ring needs adjustment, or the projector sits at an angle. Ensure the lens faces the screen straight on.
Image cut off at top or bottom: Vertical offset is wrong. Adjust projector height or use lens shift if available.
Can’t reach minimum throw distance: You need a shorter throw projector or a smaller screen.
Room too shallow: Consider an ultra-short throw model or mount the projector above seating and angle it down.
Professional installers always measure twice and mount once. Take time to verify your calculations before drilling holes. A few extra minutes of planning saves hours of patching drywall.
Screen size recommendations by room dimensions
Your room size limits your screen options. Too big and viewers in front rows strain their necks. Too small and people in back can’t see details.
Here are practical guidelines:
-
10 x 12 foot room: 80 to 100 inch screen works well. Seats 4 to 6 people comfortably.
-
12 x 16 foot room: 100 to 120 inch screen. Good for 6 to 8 viewers.
-
15 x 20 foot room: 120 to 150 inch screen. Accommodates 8 to 12 people.
-
20 x 25 foot room: 150 to 200 inch screen. Theater-style seating for 12 or more.
The Society of Motion Picture and Television Engineers recommends the screen should fill 30 to 40 degrees of your field of view from the primary seating position.
Closer to 40 degrees creates an immersive cinema experience. Closer to 30 degrees works better for mixed-use spaces where you also watch TV or play games.
Measure the distance from your main seating row to the screen. Multiply that distance by 0.6 to get a good starting screen width.
If you sit 10 feet from the screen, aim for a 6-foot-wide image, which translates to roughly a 110-inch diagonal.
Ceiling height and mounting considerations
Ceiling height affects projector placement more than people realize.
Standard 8-foot ceilings work fine for most setups. Mount the projector 6 to 12 inches from the ceiling, depending on offset.
Higher ceilings give you more options. You can mount the projector farther back and angle it down slightly.
But watch out for ceiling fans. Projectors and fan blades don’t mix. Make sure at least 2 feet of clearance exists between the projector and any moving parts.
Vaulted or sloped ceilings create challenges. You might need an adjustable ceiling mount that extends and tilts to get the projector level with the screen.
For basement theaters with exposed joists, mount directly to joists using lag bolts. Drywall anchors aren’t strong enough for projectors weighing 10 to 30 pounds.
Always account for heat. Projectors exhaust hot air. Don’t mount them in enclosed spaces or directly against a ceiling. Leave at least 6 inches of clearance around ventilation ports.
Portable and temporary setups
Not everyone wants a permanent installation. Portable projectors need throw distance calculations too.
For backyard movie nights, measure from where you’ll place the projector (table, tripod, ground) to your screen or white sheet.
Outdoor screens often come in standard sizes: 120, 150, or 200 inches diagonal. Use those dimensions with your throw ratio to find placement.
Wind affects outdoor setups. Secure your projector and screen. A gust that moves your screen even slightly will misalign your carefully calculated setup.
Office presentations follow similar rules. Conference room projectors usually mount permanently, but if you’re bringing your own, measure the room beforehand.
Know the distance from the presentation table to the screen. Calculate what image size you can achieve from that position.
For camping or travel, ultra-short throw projectors shine. You can project a 100-inch image from just 2 feet away, making setup anywhere possible.
Making the numbers work for you
Projector throw distance calculators remove guesswork from installation. You don’t need to be a mathematician or professional installer.
Start with your room dimensions. Measure wall-to-wall where you plan to install. Note any obstacles like columns, doorways, or furniture.
Decide on screen size based on seating distance and room use. Bigger isn’t always better if it strains eyes or overwhelms the space.
Find your projector’s throw ratio. Use the formulas provided or plug numbers into an online calculator. Double-check your math.
Account for offset and lens shift. These features give you installation flexibility but require additional measurements.
Mark your mounting position. Test before permanent installation. Project onto the wall and verify size and alignment.
Adjust as needed. Zoom lenses and lens shift let you fine-tune without relocating the entire projector.
Once everything aligns, secure your mount and enjoy perfectly sized images every time you power on.
The time you spend measuring and calculating pays off in years of comfortable viewing without neck strain, squinting, or wasted wall space.
Leave a Reply