
Behind your entertainment center, there’s probably a tangled mess of black cables that all look identical. When something stops working or you need to upgrade a component, you’re stuck tracing every cable by hand, hoping you don’t accidentally unplug the wrong thing. That frustration ends today.
Labeling your home theater cables with a consistent system saves hours during troubleshooting and upgrades. Use waterproof labels at both ends of each cable, include the source and destination devices, and maintain a simple reference document. The 15 minutes you spend labeling today prevents countless headaches later when you need to identify connections.
Why Most Cable Labels Fail After Six Months
Most people grab a roll of masking tape and a Sharpie, scribble something like “TV” on a few cables, and call it done. Three problems happen next.
The adhesive dries out and the labels fall off behind your equipment rack where you can’t reach them. The ink fades or smears when you touch it. And worst of all, vague labels like “HDMI 1” mean nothing six months later when you’ve forgotten which device that was.
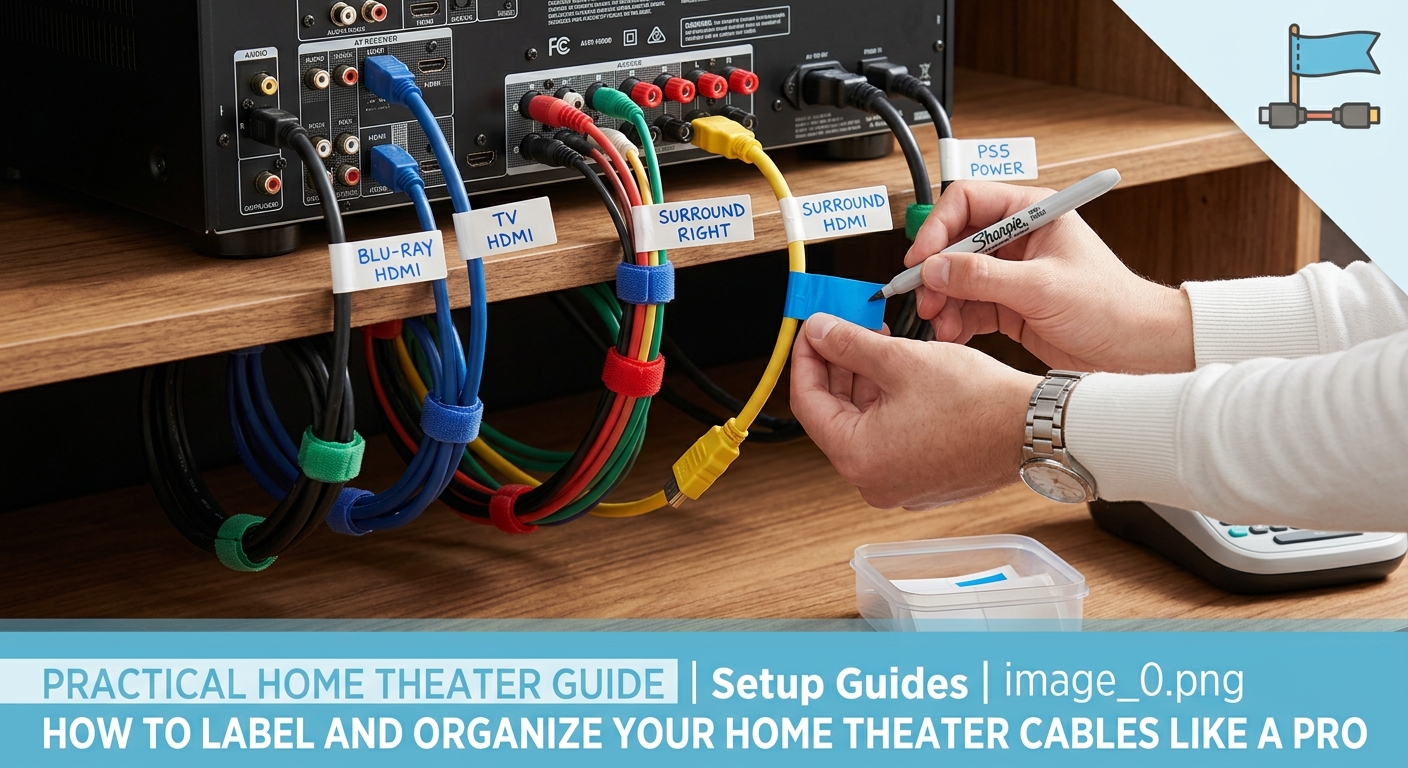
Professional installers use a different approach. They label both ends of every cable with specific information that stays readable for years. The label tells you exactly what’s connected without having to trace anything or pull equipment out.
The Three-Part System That Actually Works
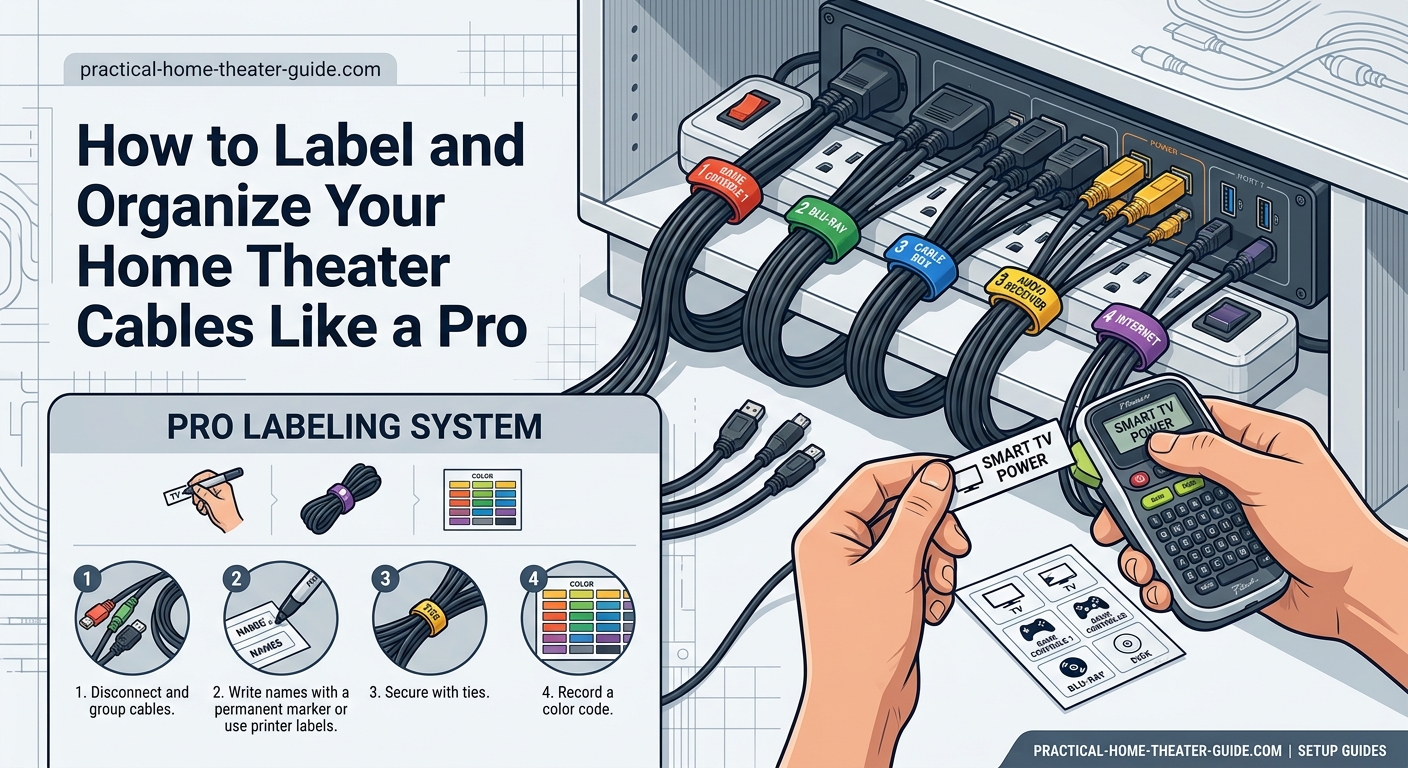
A proper labeling system has three components working together. You need durable labels that stick permanently, a naming convention that makes sense at a glance, and a backup reference system.
Start with the labels themselves. Vinyl cable labels with strong adhesive survive heat from equipment and don’t peel off when you move cables around. Paper labels with laminate coating work too, but avoid anything that relies on weak adhesive or paper that tears easily.
Your naming convention should identify the source device, the cable type, and the destination. A label reading “Roku > HDMI > Receiver In2” tells you everything you need to know without consulting notes or tracing cables.
The backup reference is a simple document or photo on your phone showing your complete setup. When you make changes months later, you can verify connections without crawling behind furniture.
Choosing Labels That Last Through Equipment Changes
Cable labels come in several formats. Each has specific advantages depending on your setup and how often you change equipment.
Wrap-around vinyl labels circle the cable completely and can’t fall off. They work perfectly on power cables, HDMI cables, and any connection you rarely touch. The downside is they’re harder to read when cables bundle together tightly.
Flag-style labels stick to the cable but have a tab that hangs free, making them easy to read even in tight spaces. These work great near connection points where you need to identify cables at a glance.
Heat-shrink labels slide over cable ends before you make connections, then shrink tight with a heat gun. They’re permanent and professional-looking, but you can’t change them without cutting them off. Only use these on cables you know won’t move between devices.
For temporary setups or equipment you frequently swap, removable vinyl labels with repositionable adhesive let you update labels without leaving residue. They’re not as durable as permanent options, but they’re perfect for testing configurations.
Step-by-Step Cable Labeling Process
Label your cables systematically to avoid missing connections or creating confusion later. This process takes about 15 minutes for a typical five-component setup.
- Disconnect one cable at a time, starting with the device furthest from your receiver or TV.
- Clean both ends of the cable with isopropyl alcohol to remove dust and oils that prevent labels from sticking.
- Write the source device name on a label, add the cable type, then add the destination and port number.
- Apply labels 2-3 inches from each connector where you can read them without unplugging anything.
- Reconnect the cable before moving to the next one so you don’t lose track of what goes where.
- Take a photo of your labeled connections from multiple angles for your reference file.
Never label all your cables at once while everything is disconnected. You’ll inevitably mix something up and spend an hour troubleshooting why nothing works.
Creating a Naming System That Makes Sense in the Dark
Your labels need to communicate clearly even when you’re reaching behind equipment with a flashlight. Use a consistent format that prioritizes the most important information.
Put the source device first because that’s usually what you’re trying to identify. “PS5” or “Blu-ray” tells you immediately what’s connected. Avoid abbreviations that seemed obvious when you wrote them but make no sense later.
Include the cable type next. “HDMI,” “Optical,” or “Component” prevents confusion when multiple cable types connect the same devices. This matters especially when dealing with audio connections that might use HDMI, optical, or analog simultaneously.
End with the destination and specific port. “Receiver HDMI3” or “TV Arc” tells you exactly where the other end connects. Port numbers matter because receivers and TVs have multiple inputs, and some ports support different features.
Here are examples of clear labels:
- Apple TV > HDMI > Receiver In1
- Receiver > HDMI ARC > TV Port2
- Subwoofer > RCA > Receiver Sub Out
- PS5 > HDMI > TV HDMI4 (for when you bypass the receiver for gaming)
Common Labeling Mistakes That Create More Problems
Even with good intentions, several labeling errors make troubleshooting harder instead of easier. Avoid these common problems.
Labeling only one end of each cable saves time initially but costs you later. When you’re looking at the back of your TV trying to figure out which HDMI cable goes where, labels on the receiver end don’t help at all.
Using device model numbers instead of functions creates confusion after upgrades. A label reading “Denon AVR-X3700H” means nothing once you replace that receiver. “Receiver” or “AVR” stays relevant regardless of the specific model.
Forgetting to label power cables causes problems during troubleshooting. When you need to power cycle specific devices, unlabeled power cables force you to trace each one or unplug everything.
Placing labels too close to connectors makes them impossible to read without unplugging cables. Leave 2-3 inches of space so you can see labels while everything stays connected.
| Labeling Approach | Readability | Durability | Best Use Case |
|---|---|---|---|
| Wrap-around vinyl | Good in open spaces | Excellent | Permanent installations |
| Flag-style tags | Excellent | Good | Tight cable bundles |
| Heat-shrink | Good | Excellent | Professional installs |
| Removable vinyl | Excellent | Fair | Temporary setups |
| Masking tape | Poor | Very poor | Never (use something better) |
Tools and Materials You Actually Need
You don’t need expensive equipment to create professional labels. A few basic supplies handle most home theater setups.
A label maker with laminated tape creates durable, professional-looking labels that survive for years. Brother P-Touch models around $30 work perfectly for this application. The laminated tape resists smudging and won’t fade like handwritten labels.
If you prefer handwritten labels, use vinyl cable labels designed specifically for this purpose. These come pre-cut with strong adhesive and enough writing space for clear identification. A fine-point permanent marker designed for plastic surfaces writes clearly and won’t smear.
Keep isopropyl alcohol and lint-free cloths handy for cleaning cables before labeling. Labels stick much better to clean surfaces, and this step takes just a few seconds per cable.
Cable ties or velcro straps help organize labeled cables so labels remain visible. Even perfect labels don’t help if they’re twisted facing the wall.
Managing Labels When You Upgrade Components
Your labeling system needs to accommodate equipment changes without requiring you to relabel everything. Plan for updates from the start.
When you replace a device, update only the labels directly connected to that device. If you swap your Blu-ray player for a new model, relabel those cables but leave everything else alone. This incremental approach prevents confusion and saves time.
Keep a small sheet of blank labels near your equipment. When you add a device temporarily to test something, label those cables immediately. Temporary connections have a way of becoming permanent, and unlabeled cables create problems months later.
For devices you swap frequently, like game consoles or streaming boxes, consider using removable labels or leaving the destination side generic. A label reading “Streaming Box > HDMI > Receiver In3” works regardless of whether you’re using a Roku, Apple TV, or Fire Stick.
Professional installers label based on function rather than brand because equipment changes but the system layout stays consistent. This approach means labels remain accurate through multiple upgrade cycles without constant relabeling.
Creating Your Cable Reference Document
Labels handle 90% of identification needs, but a reference document solves edge cases and helps when you make major changes. This doesn’t need to be complicated.
Take photos of your connections from multiple angles after labeling everything. Get close-ups of each device’s back panel showing all connections. Store these photos in a dedicated album on your phone or in a cloud folder you can access from anywhere.
Create a simple text document listing each device and its connections. Format it like this:
Roku Ultra
– Power: Surge protector outlet 3
– HDMI out: Receiver HDMI In1
AV Receiver
– Power: Surge protector outlet 1
– HDMI out: TV HDMI2 (ARC)
– All speaker connections: See speaker diagram photo
This reference takes five minutes to create and saves hours when you need to troubleshoot or make changes. Update it whenever you modify your setup.
For complex setups with multiple HDMI switches or audio extractors, draw a simple connection diagram. You don’t need fancy software. A photo of a hand-drawn sketch works perfectly and often makes more sense than a formal diagram.
Special Cases That Need Different Approaches
Some cable types and situations require modified labeling strategies. These exceptions handle specific challenges in home theater setups.
Speaker cables need labels that identify both the speaker location and the receiver channel. “Front Left > Receiver FL” prevents confusion when multiple speaker cables bundle together. If you’re running cables through walls, as covered in our guide on how to run speaker wire through walls without damaging your home, label both ends before fishing cables through.
Optical audio cables look identical from both ends and have no obvious directionality, making labels critical. Label the source end clearly so you don’t accidentally reverse the connection during troubleshooting.
For setups using HDMI switches or splitters, label both the device ports and the cables. “HDMI Switch Out1 > TV” and “HDMI Switch In2 > Blu-ray” prevent confusion about which port serves which purpose.
When connecting equipment in a rack or cabinet, label cables before routing them through cable management. Once cables bundle together and route through channels, adding labels becomes nearly impossible without disconnecting everything.
Maintaining Your Labeling System Over Time
A labeling system only helps if it stays current. Build simple maintenance habits that keep labels accurate and readable.
Check your labels every six months when you clean your equipment. Look for labels that have faded, peeled, or become unreadable. Replace them before they fall off completely and you lose track of connections.
Whenever you add a device, label its cables immediately before you finish the installation. The temptation to “do it later” means it never happens, and you end up with a mix of labeled and unlabeled cables that creates more confusion than no labels at all.
If you notice a label that’s confusing or unclear, fix it right away. Don’t wait until you’re troubleshooting a problem to realize your labeling system has issues. A label that made sense when you wrote it might be ambiguous when you read it six months later.
Keep extra blank labels and a marker in your equipment cabinet or media center. When you need to make a temporary connection or test something, proper labeling takes just 30 seconds if supplies are handy.
Handling Multiple Input Sources and Complex Routing
Modern home theaters often have multiple paths for signals to reach displays and speakers. Clear labeling becomes even more important in these complex setups.
When devices connect directly to your TV for gaming or to bypass the receiver, label these alternate paths clearly. “PS5 > HDMI > TV HDMI4 (Direct)” distinguishes this connection from the main receiver path. This clarity helps when you’re switching between gaming mode and movie mode.
For systems using HDMI ARC or eARC to send TV audio back to the receiver, label both ends of this critical connection. “TV HDMI2 ARC > Receiver HDMI ARC” prevents confusion about which HDMI port handles the return audio channel. If you’re troubleshooting audio issues, check out our guide on how to fix HDMI ARC audio dropouts and cutting out for solutions.
When multiple devices share input switching, label the switch itself and all connected cables. A simple HDMI switch might have four inputs and one output, but without labels, you’ll forget which input connects to which device.
Labeling for Future You and Other People
Your labeling system should make sense to anyone who needs to use or service your equipment. Design labels assuming you’ll forget everything about your setup.
Avoid inside jokes or personal shorthand in labels. “The good HDMI” or “New one” mean nothing six months later or to anyone else who needs to work on your system. Use clear, descriptive names that communicate function without context.
If family members or roommates use your system, labels help them troubleshoot basic problems without your help. Clear labels mean they can power cycle the right device or switch inputs without calling you away from work or waking you up.
For rental properties or homes you might sell, proper labeling adds value and makes the transition smoother. New occupants can understand your setup without having to trace every cable or disassemble everything to figure out what connects where.
When to Use Color Coding Alongside Labels
Color coding adds a visual layer that speeds up identification, but it works best as a supplement to text labels, not a replacement. Use colors strategically for specific purposes.
Color-code cable types rather than devices. Red for HDMI, blue for network cables, yellow for optical audio creates patterns that help you identify cable types at a glance. This works especially well when multiple cable types connect the same devices.
Avoid using color as the only identification method. Colors are harder to distinguish in low light, and some people have difficulty with color perception. Always include text labels as the primary identification.
If you use colored cables or colored labels, document your color scheme in your reference document. “Red = HDMI, Blue = Network, Yellow = Optical” ensures you remember the system later.
For complex installations with multiple zones or rooms, color coding by zone makes sense. All living room equipment uses one color scheme, bedroom equipment uses another. This helps when cables from different zones run through the same pathways.
Making Labels Work in Tight Spaces
Home theater equipment often lives in cramped cabinets or wall-mounted shelves where space is limited. Adapt your labeling approach to work in confined areas.
Use flag-style labels in tight spaces where wrap-around labels would be impossible to read. The flag extends out from the cable bundle, remaining visible even when cables pack tightly together.
Place labels on the cable rather than near connectors when space behind equipment is extremely limited. A label 6-8 inches from the connector might be easier to see than one right at the connection point.
For equipment mounted in walls or ceilings, label cables before installation. Once equipment is in place, accessing cable ends becomes difficult or impossible. Label both ends of every cable while everything is still accessible.
When using cable management channels or raceways, position labels so they’re visible when channels are open but before you remove cables. This lets you identify cables for troubleshooting without fully disassembling your cable management.
Your Cables Are Now Actually Organized
Proper cable labeling transforms your home theater from a confusing tangle into a system you can troubleshoot and upgrade with confidence. The small investment of time today pays dividends every time you need to change something, fix a problem, or help someone else understand your setup.
Start with the cables you touch most often. Label your main HDMI connections and power cables first. Then work through audio connections and less frequently used cables. Even partial labeling helps more than no labeling at all, and you can always add more labels as you go.
Your future self will thank you the next time something stops working at 9 PM on a Friday night and you need to identify connections without pulling your entire entertainment center apart.


Leave a Reply